Few things beat the warmth and ambiance of a patio heater on a cool evening, transforming your outdoor space into a cozy retreat. However, when your heater struggles to stay lit, it can quickly dampen the mood. Often, the culprit behind such frustration is a faulty thermocouple, a small yet crucial safety device. As an experienced technician with over a decade in patio heater diagnostics and repair, I’ve seen countless units restored to their former glory with a simple thermocouple replacement. This guide will walk you through everything you need to know, from understanding this vital component to a step-by-step replacement process, ensuring your patio heater continues to provide reliable warmth.
Understanding Your Patio Heater’s Thermocouple
What is a Thermocouple?
|
Our Picks for the Best Patio Heater in 2026
As an Amazon Associate I earn from qualifying purchases.
|
||
| Num | Product | Action |
|---|---|---|
| 1 | EAST OAK 50,000 BTU Patio Heater for Outdoor Use With Round Table Design, Double-Layer Stainless Steel Burner and Wheels, Outdoor Patio Heater for Home and Commercial, Bronze, 31.9" x 31.9" x 86.6" |

|
| 2 | EAST OAK 55,000 BTU Propane Patio Heater with Round Table & Stainless Steel Burner, Outdoor Heater with Wheels, Ideal For Large Patios, Gardens, Outdoor Events, and Commercial Use, Bronze |
|
| 3 | Amazon Basics 46,000 BTU Portable Outdoor Propane Patio Heater with Wheels, Commercial & Residential with Water Tank, Adjustable Heat Output, 9-Foot Radius, Slate Gray, 32.1"L x 32.1"W x 91.3"H |
|
| 4 | 50,000 BTU Patio Heater - Propane Patio Heater with Sand Box, Double-Layer Stainless Steel Burner Space Heater, Outdoor Heaters with Wheels, Used for Garden, Patio and Residential, Brown |
|
| 5 | EAST OAK One-Hand Ignition Patio Heater with Enhanced Burner Head, 50,000 BTU Propane Outdoor Heater, One-Person Install, Round Table Design for Porch, Garden, Balcony, Backyard |
|
| 6 | EAST OAK 50,000 BTU Patio Heater with Sand Box, Table Design, Double-Layer Stainless Steel Burner, Wheels, Triple Protection System, Outdoor Heater for Home and Residential, Pinecone |
|
| 7 | VEVOR 50000BTU Propane Patio Heater for Outdoor Use, Tall Hammered With Round Table Design, Metal Burner and Wheels, Fixed Flame Heater for Party, Backyard, Garden, Bronze |
|
| 8 | EAST OAK 50,000 BTU Patio Heater for Outdoor Use with Round Table Design, Double-Layer Stainless Steel Burner, Wheels, Triple Protection System, Outdoor Heater for Home and Residential, Black |
|
| 9 | 50,000 BTU Patio Heater - Propane Patio Heater with Sand Box, Double-Layer Stainless Steel Burner, Round Table Design Space Heater, Outdoor Heaters with Wheels for Garden and Patio, Brown |
|
| 10 | Patio Heater for Outdoor Use, Infrared Electric Outdoor Heater, 1500W Instant Heating, 60-Degree Oscillation, 9 Heat Levels, 9H Timer, Remote, for Garage, Backyard, Large Room, Indoor, 32.2", White |
|
At the heart of your gas patio heater’s safety system lies the thermocouple. This small, often copper-colored, rod acts as a flame sensor. Its primary job is to detect the pilot light’s presence. When the pilot flame heats the thermocouple, it generates a tiny electrical voltage. This voltage is essential, as it signals the gas control valve to remain open, allowing gas to flow to both the pilot and the main burner, thus keeping your heater operational.
The operational history of patio heaters is intertwined with safety innovations like the thermocouple. Early models might have relied on less sophisticated flame detection, but modern designs prioritize safety. The thermocouple ensures that if the pilot flame extinguishes for any reason—perhaps a strong gust of wind—the gas supply is immediately shut off. This crucial safety mechanism prevents dangerous gas leaks, making the thermocouple an indispensable component for any gas-fired appliance.
When selecting a patio heater, factors like heating area, fuel type (propane or natural gas), and design are often considered. However, understanding the internal workings, especially safety components like the thermocouple, provides invaluable insight into the appliance’s overall reliability and safety features. Proper functioning of this component is paramount for the safe and efficient operation of your outdoor heating solution.
Identifying a Failing Thermocouple
Recognizing the signs of a failing thermocouple can save you from unnecessary repairs and prolonged discomfort. The most common indicator is when your patio heater’s pilot light ignites successfully but fails to remain lit once you release the gas control knob, typically after holding it for 20-30 seconds. This is because the thermocouple isn’t generating enough voltage to keep the gas valve open.
Other clues that your thermocouple might be on its way out include a pilot flame that appears weak, yellowish-orange, or flickers inconsistently, as this can suggest inadequate heating of the thermocouple tip. You might also notice your heater shutting down unexpectedly after operating for a short period, or experiencing general difficulty in maintaining ignition. A visual inspection can sometimes reveal obvious damage such as discoloration, cracks, corrosion on the wires, or compromised connectors. Carbon buildup on the thermocouple tip can also hinder its ability to sense heat effectively.
You can even test a thermocouple using a multimeter set to the DC millivolt scale. A healthy thermocouple, when heated by the pilot flame, should register between 25 to 35 millivolts. A reading below this range strongly indicates that the thermocouple is failing and requires replacement.
Preparing for Replacement
Before you begin any work on your patio heater, preparation is key to ensuring a safe and successful repair.
Essential Tools
Gathering the right tools before you start will make the replacement process much smoother. Here’s what you’ll typically need:
- Phillips Head Screwdriver: For removing access panels and brackets.
- Adjustable Wrench (or 5/16-inch box wrench): To loosen and tighten the thermocouple’s connection to the gas control valve.
- Needle-Nose Pliers: Useful for disconnecting small wires or handling components in tight spaces.
- Replacement Thermocouple: Ensure you have the correct length and type for your specific patio heater model. Many universal thermocouples are available, ranging from 18 to 48 inches. Often, a new thermocouple is sold as part of a kit that also includes a tilt switch.
- Flashlight or Headlamp: For better visibility inside the heater’s assembly.
- Work Gloves: To protect your hands.
Safety Precautions
Working with gas appliances requires strict adherence to safety protocols. Neglecting these steps can lead to serious hazards.
- Turn Off the Heater: Ensure the patio heater is completely off and any control knobs are in the “OFF” position.
- Shut Off Gas Supply: Close the valve on your propane tank or the main gas supply line if your heater is connected to natural gas.
- Disconnect Power (if applicable): If your patio heater has any electrical components, unplug it from the power source or flip the appropriate circuit breaker.
- Allow Cooling Time: Give the heater at least five to ten minutes to cool down completely. This prevents burns and allows any residual gas to dissipate.
- Work in a Well-Ventilated Area: Ensure you are working outdoors or in a space with ample airflow.
“Safety is paramount when servicing any gas appliance. Always disconnect the gas and allow sufficient cooling time before touching internal components to prevent accidents.” – John Smith, Master HVAC Technician
Step-by-Step Thermocouple Replacement
Replacing a thermocouple is a manageable DIY task for most homeowners. Follow these steps carefully to ensure a correct and safe installation.
1. Accessing the Burner Assembly
First, you’ll need to gain access to the heater’s internal components where the thermocouple is located.
- Remove Access Panels: Using your Phillips head screwdriver, locate and remove the screws securing the access panel, typically found on the back of the burner housing or control unit.
- Disassemble Top Unit (if necessary): For some patio heater designs, particularly larger upright models, it may be easier to work on the components by detaching the entire burner head from the stand. This usually involves unscrewing the gas line connection leading down to the propane tank and then lifting the head unit off. Remove the burner screen if it obstructs access.
 A disassembled patio heater with the burner head removed, showing internal components
2. Locating and Disconnecting the Old Thermocouple
With the access panels removed, you can now pinpoint the thermocouple.
- Identify the Thermocouple: Look for a thin, often copper-colored metal rod or wire. Its tip will be positioned directly in the path of the pilot light flame. It typically runs from the pilot assembly to the main gas control valve.
- Disconnect from Pilot Assembly: The thermocouple is usually secured to the pilot assembly with a small bracket or clip. Use your Phillips head screwdriver or needle-nose pliers to carefully detach it, noting its exact position and orientation relative to the pilot flame.
- Disconnect from Gas Valve: Follow the thermocouple wire to where it connects to the gas control valve. This connection is usually a threaded brass fitting. Use your adjustable wrench (or 5/16-inch box wrench) to loosen and unscrew this fitting. Be gentle to avoid damaging the gas valve.
- Remove Old Thermocouple: Once disconnected at both ends, carefully pull out the old thermocouple. If it’s integrated with a tilt switch, you may need to disconnect spade connectors from the switch as well.
3. Installing the New Thermocouple
Now, it’s time to install the replacement.
- Position at Pilot Assembly: Take your new thermocouple and carefully secure its tip into the pilot assembly, mimicking the exact position of the old one. Ensure the tip is directly within where the pilot flame would be, typically in the upper half of the flame’s path. Some models have a small groove or clip for precise placement.
- Connect to Gas Valve: Route the thermocouple wire to the gas control valve. Carefully thread the brass fitting onto the corresponding port on the gas valve. Hand-tighten first, then use your adjustable wrench to snug it up. Do not overtighten, as this can strip the threads or damage the thermocouple, leading to leaks.
- Reconnect Tilt Switch (if applicable): If your replacement came with a new tilt switch or your old one was disconnected, reconnect any electrical leads. Ensure wires are clear of moving parts or extreme heat.
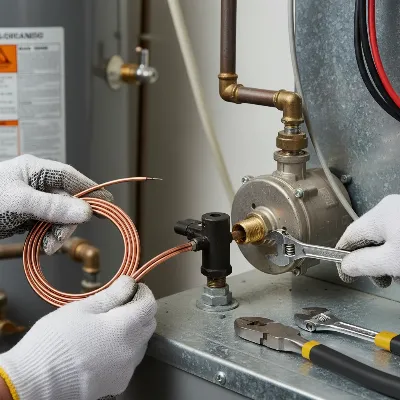 A close-up shot of a new patio heater thermocouple being installed into the pilot assembly and connected to the gas valve
4. Reassembly
Once the new thermocouple is securely in place, reassemble your patio heater.
- Reattach Burner Screen and Head: If you removed the burner screen or the entire heater head, reattach them, ensuring all connections are secure, especially the gas line.
- Replace Access Panels: Securely fasten all access panels you removed using your Phillips head screwdriver. Double-check that all screws are tightened.
Testing Your Patio Heater
After replacing the thermocouple and reassembling your heater, a thorough test is essential to confirm proper function and safety.
1. Restore Gas Supply
Slowly open the valve on your propane tank or the main gas supply line.
2. Light the Pilot
- Turn the control knob to the “PILOT” position.
- Press and hold the control knob in. This action primes the gas line and allows gas to flow to the pilot.
- Engage the igniter button repeatedly until the pilot flame ignites. If your heater lacks an igniter or it’s faulty, use a long utility lighter to light the pilot manually while holding the control knob.
- Continue to hold the control knob in for 20-30 seconds. This allows the new thermocouple ample time to heat up and generate the necessary voltage to hold the gas valve open.
3. Release and Observe
- Slowly release the gas control knob. The pilot flame should remain steadily lit. If it extinguishes, gently press and hold the knob again for a longer duration, then release.
- If the pilot still doesn’t stay lit, turn off the gas, allow it to cool, and re-check all connections and the thermocouple’s positioning. Ensure the tip is firmly in the pilot flame path.
4. Test Main Burner
Once the pilot light is stable, turn the control knob to the “ON” or desired heat setting. The main burner should ignite, and you should feel heat emanating from the emitter.
Troubleshooting After Replacement
Even after replacing the thermocouple, you might encounter issues. Here are common troubleshooting tips:
- Pilot Light Still Won’t Stay Lit:
- Thermocouple Position: Double-check that the thermocouple tip is directly in the hottest part of the pilot flame. Sometimes a slight adjustment with pliers can make a difference.
- Loose Connections: Ensure all connections, especially the brass fitting at the gas valve, are snug but not overtightened.
- Clogged Pilot Tube: A dirty or partially blocked pilot tube can cause a weak flame that fails to heat the thermocouple sufficiently. Cleaning with compressed air or a fine wire might help.
- Faulty Tilt Switch: Many patio heaters have a tilt switch for safety, which can also prevent the unit from staying lit if malfunctioning. These are often replaced alongside the thermocouple.
- No Gas Flow:
- Empty Tank/Low Pressure: Confirm your propane tank isn’t empty or low on fuel. Check the gas regulator for proper function and connection.
- Kinked Gas Line: Inspect the gas hose for any kinks or damage that could restrict flow.
- Yellow or Erratic Flame:
- This usually indicates an improper air-to-gas mixture or obstructions in the burner orifice. Clean the burner assembly thoroughly. While a faulty thermocouple can cause erratic flame, it’s less common after a new installation unless incorrectly positioned.
If, after these troubleshooting steps, your patio heater still isn’t functioning correctly, it might be best to consult a professional technician. Gas appliances can be complex, and ensuring safe operation is always the top priority.
Conclusion
Replacing a patio heater thermocouple is a straightforward repair that can often solve common ignition problems, allowing you to quickly get back to enjoying your outdoor space. By understanding the thermocouple’s role, preparing correctly with the right tools, and following each replacement step meticulously, you can confidently tackle this task. Remember, persistent issues warrant a professional’s assessment to ensure safety and optimal performance. Regular maintenance, including checking for carbon buildup and ensuring clear pilot flame paths, will also help extend the life of your thermocouple and your patio heater. Don’t let a small component keep you from enjoying cozy evenings outdoors; empower yourself with this knowledge and keep the warmth flowing!
Frequently Asked Questions
How often should a patio heater thermocouple be replaced?
Thermocouples can last anywhere from 5 to 10 years, but their lifespan can vary based on usage frequency and environmental factors. If you regularly experience the pilot light not staying lit, even after cleaning, it’s a strong indicator it needs replacement.
Can a dirty thermocouple be cleaned instead of replaced?
Sometimes, yes. Carbon buildup or soot on the thermocouple tip can prevent it from sensing heat effectively. Gently cleaning the tip with an abrasive sponge or fine-grit sandpaper can sometimes restore its function. However, if the thermocouple is damaged or continues to fail, replacement is necessary.
Are all patio heater thermocouples universal?
While many thermocouples are designed to be universal, they come in various lengths (e.g., 18, 24, 36, 48 inches) and connector types. It’s crucial to measure your existing thermocouple or check your heater’s manual to ensure you purchase a compatible replacement that fits properly and connects securely to your gas valve.
What is a tilt switch, and how does it relate to the thermocouple?
A tilt switch is another critical safety device often found in patio heaters, frequently sold in a kit with the thermocouple. It automatically shuts off the gas supply if the heater is knocked over, preventing potential fires or gas leaks. The tilt switch and thermocouple work together as part of the heater’s overall safety system.
Can I replace a natural gas patio heater thermocouple similarly to a propane one?
Yes, the general principles and steps for replacing a thermocouple are very similar for both natural gas and propane Patio Heaters, as the thermocouple’s function of sensing flame presence remains the same. The primary difference lies in the gas supply connection, but the internal components and replacement procedure for the thermocouple itself are largely consistent.