Securing a tall patio heater is essential to prevent tipping, which can cause fire hazards and property damage. The primary methods for enhancing stability include weighing down the base, anchoring the unit to a stable structure, and strategic placement. By implementing these measures, you can significantly reduce the risk of accidents and safely enjoy your outdoor heating.
Understanding Why Tall Patio Heaters Tip
Tall patio heaters, while aesthetically pleasing and highly functional, possess inherent characteristics that contribute to their instability. Recognizing these factors is the first step toward implementing effective preventative measures. From their structural design to external forces, several elements can turn a steady heater into a potential hazard.
Design and Environmental Vulnerabilities
The primary reason many patio heaters are prone to tipping lies in their design. Their considerable height, often combined with a relatively small base footprint and the weight of components like propane tanks or heating elements located higher up, creates a high center of gravity. This makes them inherently top-heavy and susceptible to external forces. Beyond design, environmental elements play a significant role. Strong winds are a common culprit, exerting considerable force on the heater’s large reflector and body, especially in open, unsheltered areas. Uneven terrain, such as sloped patios, soft grass, or gravel, can also compromise the base’s stability, causing the heater to wobble and become unbalanced. Unforeseen events like falling debris or overhanging branches during a storm can strike the unit, knocking it off balance. For patio heater buying guides on this site.
The Impact of Human Interaction
Even the most robustly designed and ideally placed patio heater can be vulnerable to human interaction. Placing heaters in high-traffic areas, near walkways, or dining spaces significantly increases the likelihood of accidental bumps from people or pets. During lively gatherings, an unintentional knock can easily destabilize a tall unit. Misjudging distances in crowded settings, particularly close to doorways or pathways, further elevates the risk of someone inadvertently tipping the heater over. Careful consideration of placement, therefore, is not only about environmental factors but also about anticipating and mitigating the potential for human error.
Essential Stability Solutions for Your Patio Heater
Ensuring your tall patio heater remains firmly upright requires a combination of common-sense placement and robust securing techniques. From adding foundational weight to physically anchoring the unit, these solutions are designed to counteract the factors that cause tipping, offering a safer and more enjoyable outdoor heating experience.
Weighing Down the Base
One of the most straightforward and effective methods to enhance the stability of your patio heater is to increase the weight at its base. A heavier base lowers the heater’s center of gravity, making it significantly more resistant to wind and accidental nudges.
- Built-in Reservoirs: Many modern patio heaters come equipped with built-in reservoirs in their base specifically designed to be filled with a stabilizing agent.
- Sand: Ideal for long-term solutions, sand provides consistent weight and does not evaporate. It’s a “set and forget” option that offers excellent stability.
- Water: While water is a convenient and easily accessible option, it serves as a temporary solution. Regular checks are essential to ensure the reservoir remains full, as water can evaporate over time, especially in warmer climates.
- External Weights: For heaters without internal reservoirs, external weights are an excellent alternative.
- Sandbags: Heavy-duty sandbags, especially those designed for outdoor use and made from fire-resistant materials, can be placed directly around the heater’s base to add substantial weight.
- Specialized Weights: Some manufacturers offer specific patio heater base weights, often made of durable, weather-resistant materials, designed to fit snugly around or under the unit’s base for a cleaner aesthetic and enhanced stability. Always ensure any external weights are heat/flame resistant to prevent hazards.
“Adding weight to the base is fundamentally about changing the center of gravity. A heavier base makes the entire unit more grounded, reducing its susceptibility to the leverage created by its height.” – Alex R. Petrov, Outdoor Safety Engineer
Securing the Heater to Structures
|
Our Picks for the Best Patio Heater in 2026
As an Amazon Associate I earn from qualifying purchases.
|
||
| Num | Product | Action |
|---|---|---|
| 1 | EAST OAK One-Hand Ignition Patio Heater with Enhanced Burner Head, 50,000 BTU Propane Outdoor Heater, One-Person Install, Round Table Design for Porch, Garden, Balcony, Backyard |

|
| 2 | 50,000 BTU Patio Heater - Propane Patio Heater with Sand Box, Double-Layer Stainless Steel Burner Space Heater, Outdoor Heaters with Wheels, Used for Garden, Patio and Residential, Brown |
|
| 3 | Patio Heater for Outdoor Use, Infrared Electric Outdoor Heater, 1500W Instant Heating, 60-Degree Oscillation, 9 Heat Levels, 9H Timer, Remote, for Garage, Backyard, Large Room, Indoor, 32.2", White |
|
| 4 | EAST OAK 50,000 BTU Patio Heater with Sand Box, Table Design, Double-Layer Stainless Steel Burner, Wheels, Triple Protection System, Outdoor Heater for Home and Residential, Pinecone |
|
| 5 | EAST OAK 50,000 BTU Patio Heater for Outdoor Use with Round Table Design, Double-Layer Stainless Steel Burner, Wheels, Triple Protection System, Outdoor Heater for Home and Residential, Black |
|
| 6 | 50,000 BTU Patio Heater - Propane Patio Heater with Sand Box, Double-Layer Stainless Steel Burner, Round Table Design Space Heater, Outdoor Heaters with Wheels for Garden and Patio, Brown |
|
| 7 | Amazon Basics 46,000 BTU Portable Outdoor Propane Patio Heater with Wheels, Commercial & Residential with Water Tank, Adjustable Heat Output, 9-Foot Radius, Slate Gray, 32.1"L x 32.1"W x 91.3"H |
|
| 8 | EAST OAK 55,000 BTU Propane Patio Heater with Round Table & Stainless Steel Burner, Outdoor Heater with Wheels, Ideal For Large Patios, Gardens, Outdoor Events, and Commercial Use, Bronze |
|
| 9 | VEVOR 50000BTU Propane Patio Heater for Outdoor Use, Tall Hammered With Round Table Design, Metal Burner and Wheels, Fixed Flame Heater for Party, Backyard, Garden, Bronze |
|
| 10 | EAST OAK 50,000 BTU Patio Heater for Outdoor Use With Round Table Design, Double-Layer Stainless Steel Burner and Wheels, Outdoor Patio Heater for Home and Commercial, Bronze, 31.9" x 31.9" x 86.6" |
|
For maximum security, especially in windy conditions or high-traffic areas, physically securing your patio heater to a stable, immovable structure is highly recommended. This method prevents the entire unit from moving or toppling.
- Straps and Cords:
- Ratchet Straps or Heavy-Duty Bungee Cords: These can be used to fasten the heater’s stem or body to a nearby pillar, wall, or other sturdy, permanent outdoor fixture. Ensure the straps are made of fire-resistant materials (avoid plastic or rope that can melt or burn) and are placed a safe distance from the heater’s flame or heat source to prevent accidental damage or fire hazards.
- Placement: Wrap the straps around a robust part of the heater’s frame and secure them to an equally strong anchoring point. Double-check that all connections are taut and secure, but not so tight that they damage the heater or structure.
- Permanent Ground Fixing:
- Bolting: For the ultimate in stability, especially if you have a designated, permanent location for your heater, consider bolting it directly to a hard, flat surface like concrete or a reinforced wooden deck. This method completely eliminates the risk of tipping.
- Safety Check: Before drilling, always consult your heater’s owner’s manual to ensure that bolting is permissible and to avoid damaging any internal components like gas lines or electrical wiring. Ensure the bolts and anchors used are appropriate for outdoor conditions and the surface material.
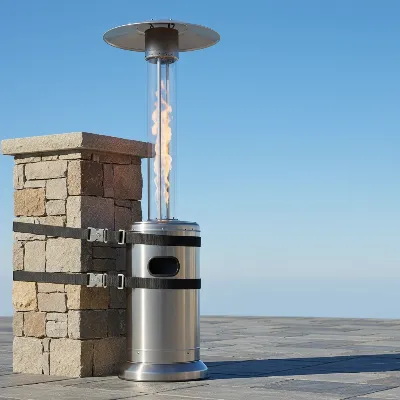 A tall patio heater secured with fire-resistant straps to a sturdy stone pillar on an outdoor patio, clear sky.
Strategic Placement for Maximum Stability
Where you place your patio heater is just as critical as how you secure it. Thoughtful placement can significantly reduce exposure to tipping hazards, enhancing both safety and heating efficiency.
- Flat, Stable, Hard Surfaces: Always position your patio heater on a hard, level surface such as concrete, paving stones, or a sturdy deck. These surfaces provide a firm foundation that minimizes wobbling and prevents the base from sinking. Avoid soft or uneven ground like grass, gravel, or mulch, which can create instability and increase the risk of tipping. If your patio has slight unevenness, use shims to level the base carefully.
- Low-Traffic Areas: To prevent accidental bumps, locate your heater in areas away from primary walkways, doorways, and high-traffic zones where people or pets are frequently moving. This reduces the chance of someone inadvertently knocking it over.
- Sheltered and Semi-Enclosed Spaces: Strong winds are a leading cause of patio heater tipping. Position your heater in a semi-enclosed area, such as a corner of your patio, against an exterior wall, or near a sturdy fence. These natural wind barriers can significantly reduce direct wind exposure, creating a more stable environment and improving heating effectiveness.
- Maintaining Safe Distances: Always adhere to the manufacturer’s recommended clearance distances from flammable objects. Typically, this is at least three feet in all directions from walls, furniture, trees, umbrellas, and other combustible materials. Overhanging branches should also be avoided, as they can fall or catch fire.
- Considering Windbreaks: For areas prone to high winds, strategically placing portable garden screens or wooden panels can create an effective windbreak around your heater. Ensure these barriers are securely anchored themselves so they don’t become hazards.
Leveraging Built-in Safety Features
Many modern patio heaters come equipped with advanced safety features designed to prevent accidents, including mechanisms specifically for tipping. Understanding and utilizing these can provide an additional layer of protection.
- Anti-Tilt Switches: A crucial safety feature in most contemporary freestanding patio heaters is the anti-tilt switch. This device automatically shuts off the gas supply or electrical power if the heater is tilted beyond a certain angle, preventing fuel leaks or overheating should the unit begin to tip. Regularly test this feature according to the manufacturer’s instructions to ensure it is functioning correctly.
- Lockable Wheels or Chocks: Some portable patio heaters are fitted with wheels for easy repositioning. While convenient, these wheels can also allow the heater to roll and become unstable in windy conditions or on sloped surfaces. Always ensure that the wheels are locked when the heater is in its operational position. For added security, consider using wheel chocks to prevent any unintended movement, particularly on slightly inclined patios.
Maintenance and Seasonal Care
Beyond initial setup, ongoing maintenance and appropriate seasonal care are vital for ensuring your tall patio heater remains stable and safe for years to come. Neglecting these aspects can compromise even the most robust securing measures.
- Regular Checks of Securing Mechanisms: Before each use, especially after periods of strong wind or heavy rain, take a moment to inspect all securing mechanisms. Check that any straps or cords are still tightly fastened and haven’t frayed or degraded. If your heater is bolted to the ground, ensure the bolts are secure and show no signs of loosening or corrosion. This quick check can identify potential weaknesses before they become hazards.
- Storing During Severe Weather: Even with all precautions, extreme weather conditions like severe storms, high winds, or heavy snowfall can still pose a risk to tall patio heaters. Whenever severe weather is forecast, it is always safest to move your portable heater to a sheltered area, such as a garage or shed. For permanently fixed heaters, consider covering them with a snug, weatherproof cover securely fastened to protect them from the elements and potential debris. If possible, disassembling the reflector and storing it indoors can prevent damage and rust.
- Checking Reservoirs: If your heater utilizes a water-filled reservoir for stability, make it a habit to check the water level regularly. Water can evaporate over time, reducing the base’s weight and compromising stability. Refill as needed to maintain optimal weighting. For sand-filled reservoirs, ensure there are no leaks or signs of sand depletion.
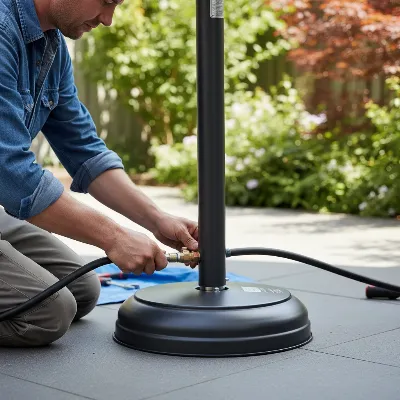 A person checking the stability and connections of a tall patio heater outdoors.
Conclusion
A tall patio heater is a fantastic addition to any outdoor space, extending the usability and comfort of your patio into cooler seasons. However, their design, while efficient, necessitates proactive measures to prevent tipping and ensure safety. By diligently weighing down the base with appropriate materials, securely anchoring the unit to stable structures, and thoughtfully choosing its placement away from high-traffic areas and direct wind, you can significantly mitigate the risk of accidents. Regular maintenance checks and smart seasonal care, including storing your heater during severe weather, further safeguard your investment and, more importantly, the well-being of everyone enjoying your outdoor oasis. Prioritizing these steps will allow you to enjoy the warmth and ambiance of your patio heater without worry, making your outdoor moments truly relaxing. What measures will you implement first to enhance your patio heater’s stability?
Frequently Asked Questions
What causes tall patio heaters to tip over easily?
Tall patio heaters often tip due to their top-heavy design, strong winds, uneven surfaces, or accidental bumps. Their height, combined with weight concentrated higher up (like a propane tank), creates a high center of gravity, making them vulnerable to external forces like gusts of wind or an unintentional push.
Is it safe to use water to add weight to a patio heater's base?
Yes, many patio heaters include built-in reservoirs designed for water to increase stability. However, water can evaporate over time, so it's crucial to check and refill the reservoir regularly to maintain the necessary weight. For a more permanent solution, sand is often preferred.
What is the recommended safe distance for a patio heater from walls?
A patio heater should generally be placed at least three feet (about 0.9 meters) away from any walls, ceilings, furniture, or other flammable objects. Always consult your specific heater's manufacturer manual for exact clearance requirements to ensure safe operation and prevent fire hazards.
How reliable are anti-tilt switches in modern patio heaters?
Anti-tilt switches are highly reliable safety features that automatically shut off the heater if it tips beyond a certain angle, preventing fuel leaks or overheating. While effective, they should be regularly tested according to the manufacturer's instructions and should not be the sole reliance for preventing tipping.
What type of straps are best for anchoring a patio heater?
When securing a patio heater with straps, use heavy-duty, fire-resistant materials such as ratchet straps or outdoor-grade bungee cords. Avoid standard ropes or plastic cords, as they can melt or burn if exposed to the heater's heat. Ensure straps are positioned safely away from direct flames or intense heat sources.
How to Secure Your Tall Patio Heater
Learn how to effectively secure your tall patio heater to prevent tipping and ensure safety in your outdoor living space.
Increase the weight at the heater's base by filling built-in reservoirs with sand or water, or by placing external fire-resistant sandbags or specialized weights around it. A heavier base lowers the center of gravity, making the heater more resistant to wind and accidental nudges.
For maximum security, use fire-resistant ratchet straps or heavy-duty bungee cords to fasten the heater to a nearby pillar, wall, or sturdy outdoor fixture. For permanent placement, consider bolting the heater directly to a hard, flat surface like concrete or a reinforced deck, ensuring to check the owner's manual first.
Position your patio heater on a hard, level surface away from high-traffic areas, doorways, and primary walkways. Place it in sheltered or semi-enclosed spaces to reduce wind exposure and always maintain at least three feet of clearance from flammable objects and overhanging branches.
Ensure your heater's anti-tilt switch is functioning correctly by testing it regularly according to the manufacturer's instructions. If your portable heater has wheels, always lock them when the unit is in its operational position and consider using wheel chocks for added security on inclined surfaces.
Before each use, inspect all securing mechanisms like straps, cords, and bolts for tightness and degradation. If using water reservoirs, check and refill the water level regularly. Store portable heaters or cover fixed ones during severe weather to prevent damage and maintain stability.
Get our weekly buyer guide
Practical specs, not advice. Unsubscribe anytime.
The advice on strategic placement was helpful, but honestly, it’s hard to find a perfect spot that’s out of the wind and still convenient. My heater still feels a little vulnerable when the wind really picks up, even after trying to move it closer to the house. It’s better, but not completely solved.
After a close call with our heater almost falling over during a storm, I knew I needed to do something. The suggestion to use a weighted base was exactly what I needed. It was easy to implement and now our heater is rock solid. We can enjoy our evenings outside without constantly worrying about it.
I was so worried about my new patio heater tipping over, especially with my kids running around. The tip about weighing down the base with sandbags was a game-changer. It feels so much more secure now, and I can actually relax when we’re out on the patio. Definitely recommend doing this for peace of mind.
We live in a pretty windy area, and our tall patio heater has always been a bit wobbly. I tried anchoring it to our deck railing, and it made a huge difference. It’s much more stable now, even on gusty days. I wish I’d thought of this sooner instead of just hoping for the best.